安裝 ampy (adafruit micropython python tool)
ampy 已經收錄在 PyPI 裡面了,因此你只要在Linux的終端機,或是Windows的「命令提示字元」(開始 → Windows 系統 → 命令提示字元),簡單下一個 pip 的指令就可以快速安裝 ampy:
pip install adafruit-ampy
如果你的電腦有共存舊版 python,則可以用以下指令:
pip3 install adafruit-ampy
安裝完成之後,只要輸入 ampy --help,就能看到這個指令的相關參數:
Usage: ampy [OPTIONS] COMMAND [ARGS]...
ampy - Adafruit MicroPython Tool
Ampy is a tool to control MicroPython boards over a serial connection.
Using ampy you can manipulate files on the board's internal filesystem and
even run scripts.
Options:
-p, --port PORT Name of serial port for connected board. Can optionally
specify with AMPY_PORT environment variable. [required]
-b, --baud BAUD Baud rate for the serial connection (default 115200).
Can optionally specify with AMPY_BAUD environment
variable.
-d, --delay DELAY Delay in seconds before entering RAW MODE (default 0).
Can optionally specify with AMPY_DELAY environment
variable.
--version Show the version and exit.
--help Show this message and exit.
Commands:
get Retrieve a file from the board.
ls List contents of a directory on the board.
mkdir Create a directory on the board.
put Put a file or folder and its contents on the board.
reset Perform soft reset/reboot of the board.
rm Remove a file from the board.
rmdir Forcefully remove a folder and all its children from the board.
run Run a script and print its output.
看看 NodeMCU裡面有哪些檔案
lsusbBus 006 Device 001: ID 1d6b:0003 Linux Foundation 3.0 root hubBus 005 Device 001: ID 1d6b:0002 Linux Foundation 2.0 root hubBus 004 Device 001: ID 1d6b:0003 Linux Foundation 3.0 root hubBus 003 Device 002: ID 2109:3431 VIA Labs, Inc. HubBus 003 Device 001: ID 1d6b:0002 Linux Foundation 2.0 root hubBus 002 Device 001: ID 1d6b:0003 Linux Foundation 3.0 root hubBus 001 Device 007: ID 1a86:7523 QinHeng Electronics HL-340 USB-Serial adapter
ls /dev/ttyUSB*/dev/ttyUSB0
查看 NodeMCU 裡面的檔案
ampy -p /dev/ttyUSB0 ls
/boot.py/main.py/webrepl_cfg.py
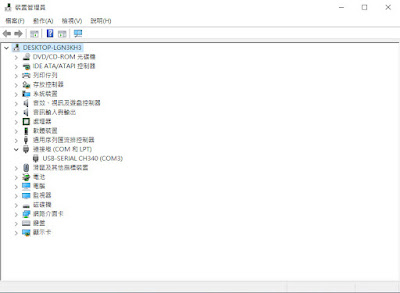
在 Windows 系統,可以去裝置管理員查看,目前 NodeMCU 是位於那一個 COM port。
按下鍵盤的 Win+R 組合鍵,然後文字方塊中輸入 devmgmt.msc,按 Enter 鍵打開裝置管理員。以我的例子來說,目前 NodeMCU v3 在 COM3 這個串列埠 (USB-SERUSL CH340):
ampy -p COM3 ls
/boot.py
/main.py
/webrepl_cfg.py
設定預設連接埠
每次要多打 -p 這個連接埠的參數有些麻煩,因此 ampy 讓你可以預設參數,如果你每次連接 NodeMCU都是在同一個 USB 插孔,而且不會偶爾多插其他 USB-SERIAL 的裝置,那建議你預設連接埠。
在 Linux 系統,只要在你的使用者的根目錄下,建立一個叫做 .ampy 的檔案,並在檔案中加入這個內容:
# Please fill in your own port, baud rate, and delay
AMPY_PORT=/dev/ttyUSB0
AMPY_BAUD=115200
ampy ls
/boot.py
/main.py
/webrepl_cfg.py
在 Windows 中,不是用 .ampy 這個檔案,而是要設定在環境變數裡面。
鍵盤按 Win+R 組合鍵,輸入 SystemPropertiesAdvanced,開啟系統內容的進階設定,點擊下面「環境變數」的按鈕,然後新增一個使用者變數:
下載檔案 get
ampy get boot.py# This file is executed on every boot (including wake-boot from deepsleep)#import esp#esp.osdebug(None)import uos, machine#uos.dupterm(None, 1) # disable REPL on UART(0)import gcgc.collect()import webreplwebrepl.start()
你也可以直接把內容存檔:
ampy get boot.py > boot.py
就可以存在目前的目錄,檔名是 boot.py
#import webrepl#webrepl.start()
上傳檔案 put
跟 ftp 指令一樣,用上傳指令 put,把剛剛去到 WebREPL 新的 boot.py 上傳至 NodeMCU:
ampy put boot.py
然後再看一次內容:
ampy get boot.py# This file is executed on every boot (including wake-boot from deepsleep)#import esp#esp.osdebug(None)import uos, machine#uos.dupterm(None, 1) # disable REPL on UART(0)import gcgc.collect()#import webrepl#webrepl.start()
原來的 boot.py 已經被新檔蓋過去了。
刪除檔案 rm
跟 Linux 的指令一樣,要刪除 NodeMCU 上面的檔案,執行 ampy rm:
ampy rm main.py
把 main.py 刪除
建立、刪除子目錄 mkdir rmdir
ampy 沒有 cd (change directory) 這個指令,因此建立子目錄之後,如果你要上傳檔案到子目錄,必須在你自己的電腦中,建立一樣的子目錄,然後上傳的時候,把整個子目錄上傳,比方說,子目錄 foo中,有一個名叫 bar.py 的檔案。你必須上傳整個子目錄:
ampy put foo
ampy ls
/boot.py
/foo
/main.py
/webrepl_cfg.py
ampy ls foo
/foo/bar.py
執行 Python 模組 run
ampy run hello.pyHello, Sir!
執行時,要確定你目前命令提示字元的工作目錄中,也有包含這個 hello.py 的檔案,才能夠使用 run,在別的目錄不行。
這個執行功能,很適合測試、除錯單一的 Python模組,在程式中使用的 print() 指令,可以在執行 run 之後印出。
NodeMCU 重開機 reset
假如,你更改了 boot.py 還是 main.py 的內容,然後要驗證更改的結果,那麼你可以執行 reset 這個指令,重開機 (電源沒有關掉的狀況,執行 soft reboot),跟你在 REPL 環境,按下 Ctrl-D 一樣。
ampy reset


沒有留言:
張貼留言